I don’t consider myself a master, but I am an experienced player of achroma. Today I thought I’d share a few tips for early players looking to improve their game. Multiplayer games are a lot of fun, but ultimately come down a lot more to chance and whether other players gang up on you or not. While there is a lot of chance in a 1v1 game of achroma, there is more scope for playing strategically and winning through clever choices and tactical play. Therefore, this article will be focused on 1v1 games.
1. Don’t overplay your hand
It’s tempting to throw down as many cards as you can as quickly as you can in a game. However, this can come back to bite you as it leaves you likely lower on shards in the early game, more open to board wipe effects like Samr Smash and Drain the Woods, and, perhaps less intuitively, it gives your opponent free rein to pick off your most powerful cards rather than burn them on your weaker cards.
To explain that last point, let’s say you were holding a Senior Painter, Trainee Painter, and Squad Leader. It would be very tempting to play the lot. It’ll cost you 8 shards, but you gain 8 shards. And in many games, that might set you up for the win, despite leaving you with a small hand.
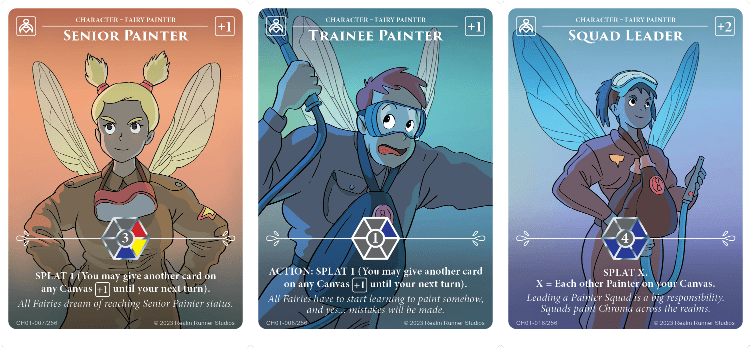
However, what happens if your opponent is holding one of the many actions that erases a character, such as Fireball, or worse, a way to claim a character like Corrupted Muon Trap? Obviously they’re going to target your Squad Leader. Next round your gain is down to a fairly mediocre +3 for your 3 card investment, and you’ve lost one of your powerful Squad Leaders who could have ended up with a much higher SPLAT if they’d just stuck around for a few more turns.
A more cautious play would be instead to just play the Senior Painter and the Trainee Painter. It costs you 4 and you gain 4, so you still finish on the same number of shards you started with. But now if the opponent decides to play their Fireball or Trap they’re taking out the less powerful Senior Painter, allowing you to come in with the Squad Leader and maybe another painter next turn. Also, holding the Squad Leader gives you some trade fodder as insurance just in case the opponent hits you with some early agressive drain. This kind of baiting play is especially valid when that third character is someone like Copper Joss who you really would rather wasn’t erased right away. Holding her for a round to bait an action or claim on a less powerful character can be an effective play.
2. Don’t leave yourself too low on shards
This one may be obvious, but I’ve seen so many players take a risk and leave themselves on 8 or even 6 shards at the end of their turn. Given how many Cintimani Stones and HAIM Shard Caches I’ve seen in custom palettes, that’s a high risk strategy even against straight-up chroma decks. Even if you don’t get drained to 0, you could easily see yourself starting your next turn on under 4 shards, severely limiting your options.

There are of course many games where taking this sort of risk can pay off, or is necessary to deal with the opponent’s boardstate. But taking the risk unnecessarily should be avoided. It’s also worth noting that you can definitely take bigger risks when playing with preconstructed decks, as these tend to lack the burst drain plays that custom palettes have.
3. Keep your eyes on the prize
I’ve been guilty of this too: your opponent has a formidable canvas, so you start playing defensively. You’re spending shards left, right, and centre on actions that erase their cards rather than focusing on your own gameplan. Sure, you feel pretty good about it, as you’ve controlled their boardstate effectively. But now you have fewer shards, fewer cards in hand, and nothing on your canvas to show for it.
Obviously this is absolutely necessary in many games, but assess how you’re doing on your path to glory first, and try to work out whether hitting their card is truly going to help you get to the finish line first. If you can trade and gain your way to victory before the opponent right now, or in the next turn or two, then it doesn’t matter what they’re up to; go for it.
4. Play action and use card abilities throughout your turn, not just in the deploy/attack phase
You can play an action whenever you like in your turn: before you draw, after you draw, midway through your resolve phase, whenever you want. However it’s common to only play these cards in the deploy and attack phase. Here’s some examples where deploying actions at other times in your turn can be hugely beneficial:
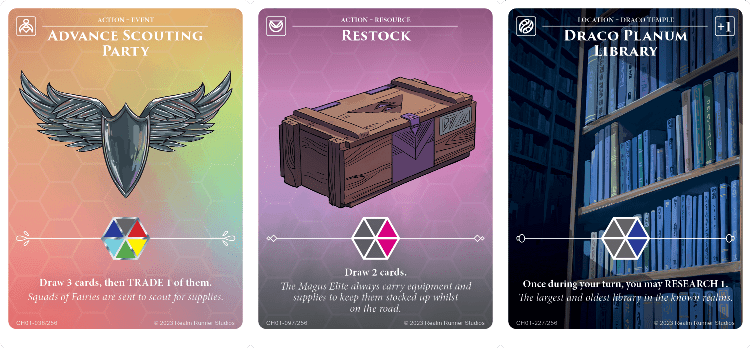
You’ve got Advance Scouting Party or Restock in your hand (or maybe a Draco Planum Library already on your canvas) and are trying to decide whether to trade or draw to start your turn. Deploy the action (or use the RESEARCH) first, and then work out whether to trade or draw. There’s a good chance you’ll draw some trade fodder, or at least draw the cards you need to make the most of your turn thanks to the action, allowing you to trade instead.
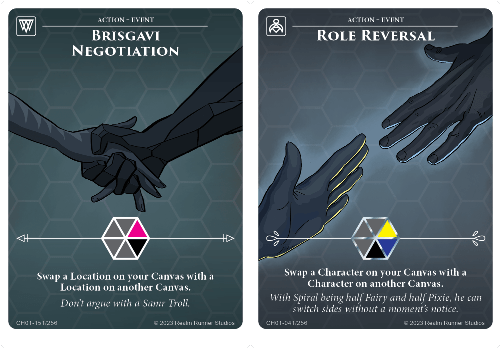
Play Brisgavi Negotiation or Role Reversal after resolving the location or character you’re giving away. Even if you’re giving the opponent a lowly Trainee Painter, get the +1 from it before you give it away, then resolve the character or location you’ve just stolen.
Play cards that REVEAL and play cards during your resolve phase, if you couldn’t afford them beforehand. For example, you want to play Factory Production Line but you don’t have enough shards. Resolve your Ray for +5 and then play it. If you hit some Funguar Eggs you can resolve it right away for an additional ±1. The same applies to runes like Algiz or Isaz.
And finally if you draw a playable action in your final draw/trade step, like Abundance of Quintessence, play it right away, provided you haven’t played 3 cards already this turn.
5. If you’re holding a powerful object, get a character down early, and play the object later offensively
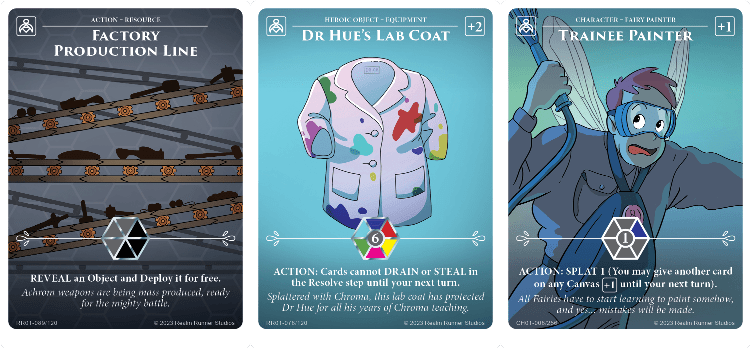
One of the most effective ways of picking off the opponent’s characters is to surprise them with a powerful object deployed to a character already on the canvas. However, this only works if your character was deployed in a previous turn, and you kept the object in your hand. If you’re holding a Factory Production Line or a Dr Hue’s Lab Coat, then play that Trainee Painter now, even if it means you miss out on the ACTION: SPLAT 1.
Playing in this order means that when the opponent smugly plays their Dove Tail (strength 4) you can respond with your object and immediately attack, essentially eliminating their character for free (yes, you paid for the object, but objects almost always come with benefits that offset the entire shard cost of the card, unlike actions that tend to just erase cards for no additional benefit).
If instead you held on to your Painter in turn 1, you wouldn’t be able to attack Dove Tail with him in turn 2. Alternatively, if you played both the Painter and the powerful object in turn 1, the opponent would likely use an action to erase or bounce your character, then play their Dove Tail in safety.
6. Don’t forget to attack
This may seem obvious, but I think it’s the most common rookie mistake. If you can attack a character with a lower shard value and strength than a character on your canvas, attack. It’s a free kill with no downside. But it’s surprisingly easy to forget.
I hope some of these tips can be useful for players starting out on their achroma journey.
Thanks for reading.
Next time you’re ordering achroma products, please use the discount code dracotemple at checkout on the achroma webstore for 10% off all orders, including pre-orders.
To activate this discount, enter the code at checkout, or go to shop.achroma.cards/dracotemple to automatically apply the code.
